Cutilagem · Sequências FWD e REW da broca chama Cutilagem com broca na manicure russa: qual rotação, FWD ou REW, cobre cada zona e por quê
Por VEL Academy · Formação profissional em manicure russa
Metodologia VEL Academy: a sequência FWD/REW descrita neste artigo — FWD no lado esquerdo, REW no lado direito — é a abordagem que a VEL Academy recomenda para uma cutilagem eficiente e repetível. Outras escolas e profissionais de manicure russa podem usar outros esquemas de rotação ou combinar as direções de outra forma, conforme a sua formação. A sequência daqui é uma recomendação metodológica para rapidez e segurança, e não uma regra universal da técnica.
A cutilagem com broca chama na manicure russa não é uma técnica à mão livre — é um sistema definido de movimentos dividido entre dois sentidos de rotação. A rotação FWD (para a frente) cuida do lado esquerdo da unha. A rotação REW (reversa) cuida do lado direito. Cada sentido fica com zonas específicas por causa da forma como o abrasivo da broca age no tecido conforme a rotação. Entender essa lógica deixa a sequência reproduzível, rápida e segura em todas as clientes.
Por que o sentido de rotação importa na cutilagem com broca
A broca chama tem superfície de corte — partículas microscópicas de diamante distribuídas na superfície. Essas partículas cortam com mais eficiência quando a broca gira no sentido que encosta a borda de ataque delas no tecido. Na rotação FWD, a broca corta melhor quando passa pelo tecido da direita para a esquerda — o que combina com as zonas do lado esquerdo da unha. Na rotação REW, o contato se inverte — e ela fica mais eficiente para a aproximação pelo lado oposto.
Na técnica da VEL Academy, isso é tratado como uma propriedade mecânica da forma como a broca age no tecido — e explica por que a sequência é montada assim. Usar FWD em zonas que deveriam ser trabalhadas em REW não dá um resultado errado, mas exige mais passadas para remover a mesma quantidade de tecido, porque a eficiência do corte é menor. Num atendimento com tempo contado, essas passadas extras são tempo que você não tem.
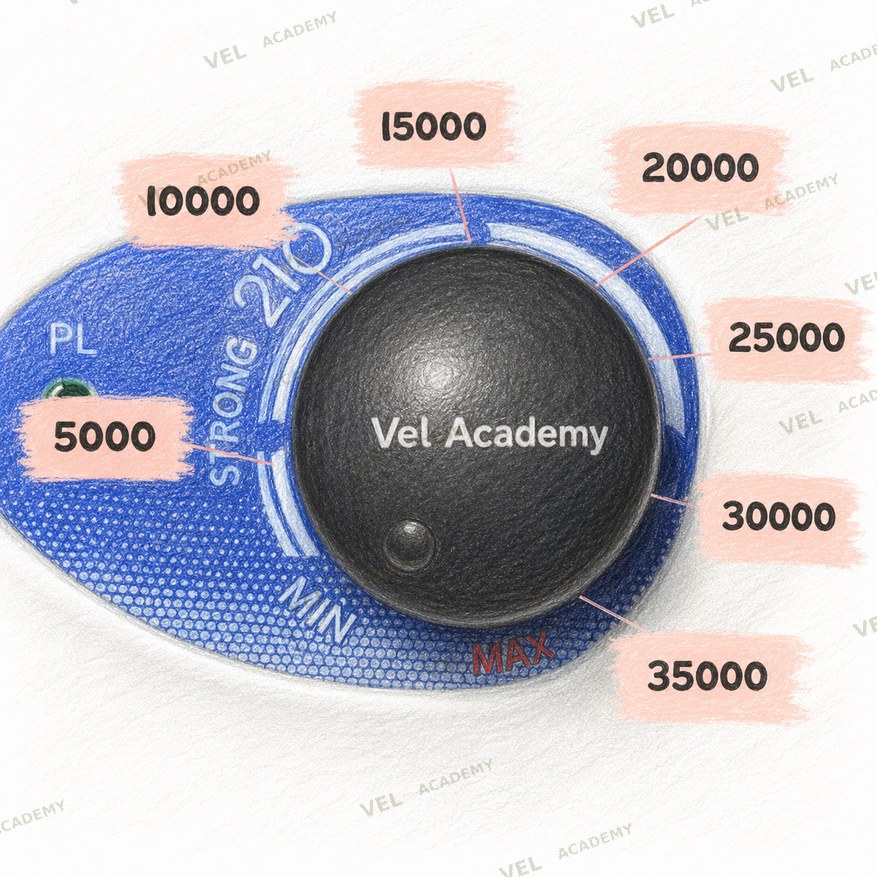
As sequências FWD e REW são feitas a 10.000 rpm — a rotação que dá controle sem acumular calor na zona da cutícula
A sequência FWD: lado esquerdo da unha (4 passos)
A rotação FWD é usada no lado esquerdo da unha, começando pelo seio direito. A sequência cobre quatro zonas em ordem, e a regra é absoluta: termine uma zona por completo antes de passar para a próxima. Não volte aos movimentos anteriores.

Passo 1 — Remoção do pterígio
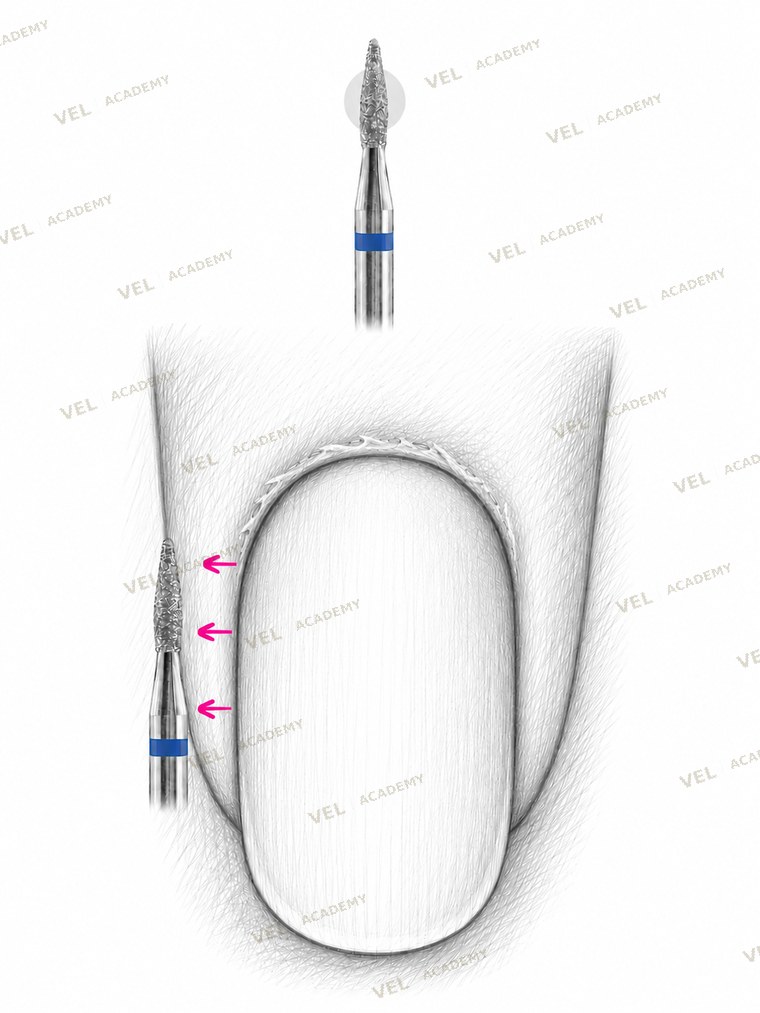
Passo 2 — Sulco lateral
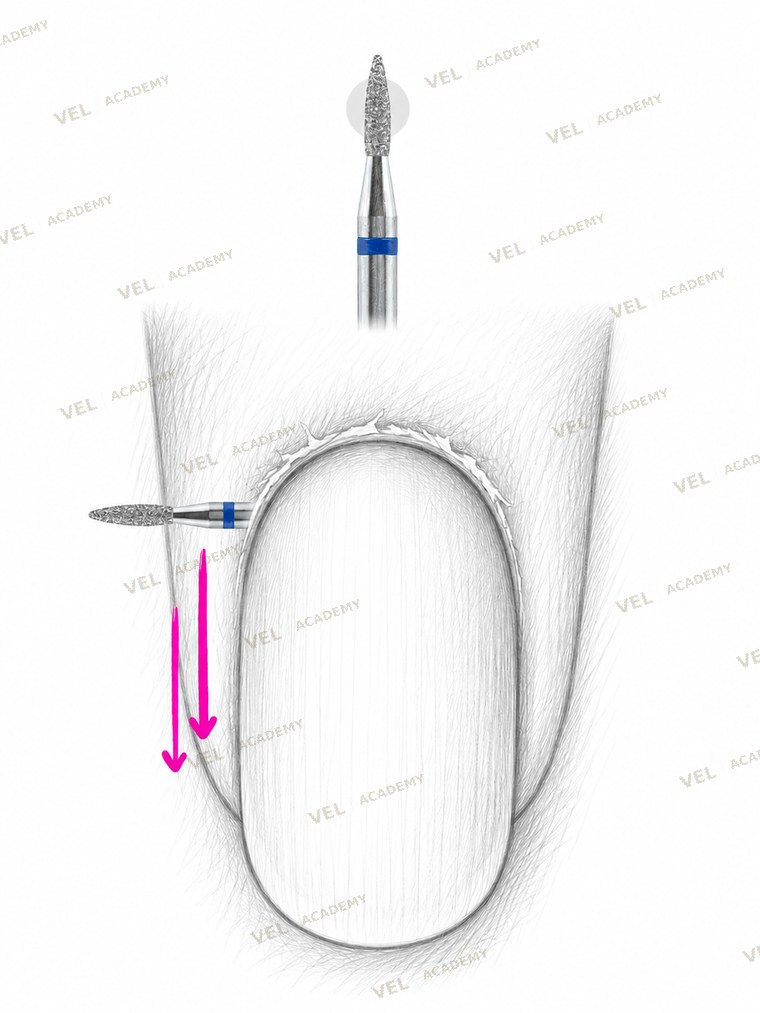
Passo 3 — Prega, da esquerda para a direita
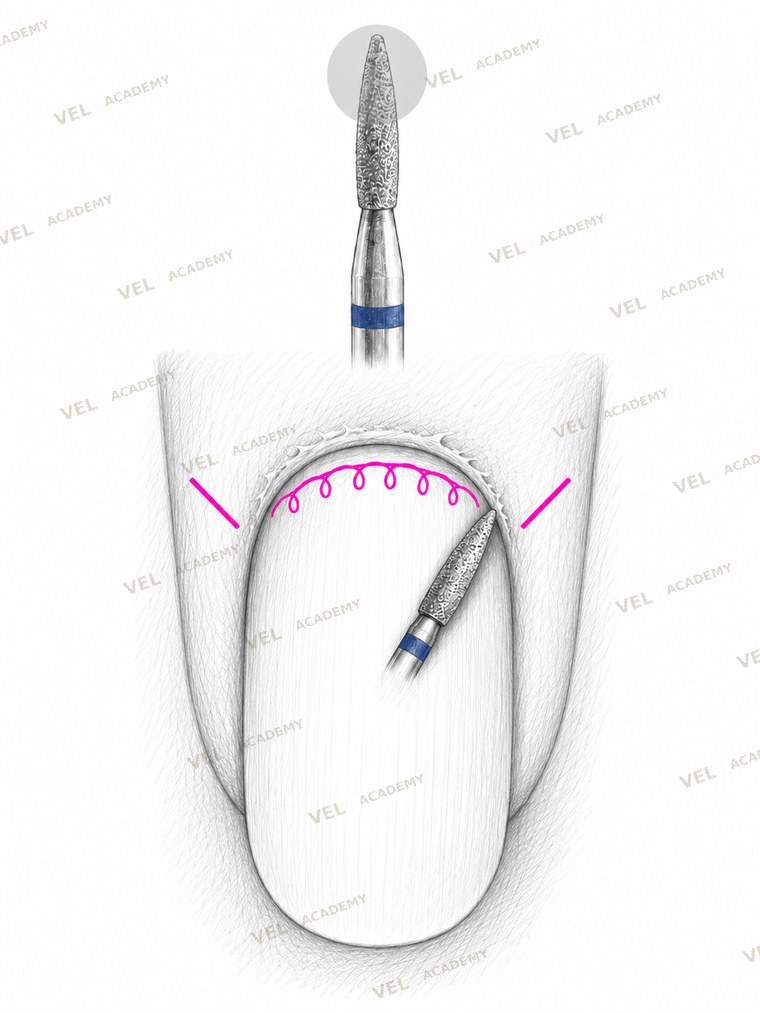
Passo 4 — Prega, de cima para baixo
FWD passo 1 — Zona do pterígio
Remova o pterígio com a lateral da broca na diagonal, trabalhando do seio direito para a esquerda com movimentos circulares curtos ao longo da lâmina ungueal. Se necessário, trabalhe a parede lateral da unha com movimentos circulares. O ponto de contato certo é a lateral da broca — e não a ponta. A ponta concentra a pressão; a lateral distribui.
FWD passo 2 — Sulco lateral
Abra o sulco lateral: posicione a ponta da broca na diagonal, funda, a partir do seio, e leve até o fim da borda livre numa única passada longa. Esse movimento abre o espaço entre a unha e a prega lateral. É um movimento único e contínuo — e não vários movimentos curtos.
FWD passo 3 — Ressecamento na prega (da esquerda para a direita)
Remova o ressecamento da prega da unha com movimentos da esquerda para a direita, usando o corpo da broca e cortando por cima. Esse movimento trata a superfície de cima da prega — a zona que a passada do sulco lateral não alcança, porque o ângulo é outro.
FWD passo 4 — Ressecamento na prega (de cima para baixo)
Remova o ressecamento que restou na prega com movimentos de cima para baixo. Esse passo trata a superfície da prega que os movimentos da esquerda para a direita não cobriram por completo. Depois do passo 4, o lado esquerdo da unha está pronto — pterígio limpo, sulco lateral aberto e prega tratada nas duas direções.
Regra da VEL Academy: nesta técnica, termine uma zona por completo antes de passar para a próxima. Não volte aos movimentos anteriores. A recomendação existe por dois motivos: mantém a eficiência da sequência (voltar às zonas custa tempo) e mantém a segurança da técnica (voltar a uma zona onde a pressão e o ângulo já foram definidos aumenta o risco de pegar a pele).
A sequência REW: lado direito da unha (4 passos)
A rotação REW é usada no lado direito da unha, começando pelo seio esquerdo. A sequência segue a mesma lógica da FWD, mas muda os pontos de entrada e a direção dos movimentos. Cada movimento em REW é repetido cerca de 3 vezes — o número exato depende da complexidade das mãos da cliente.
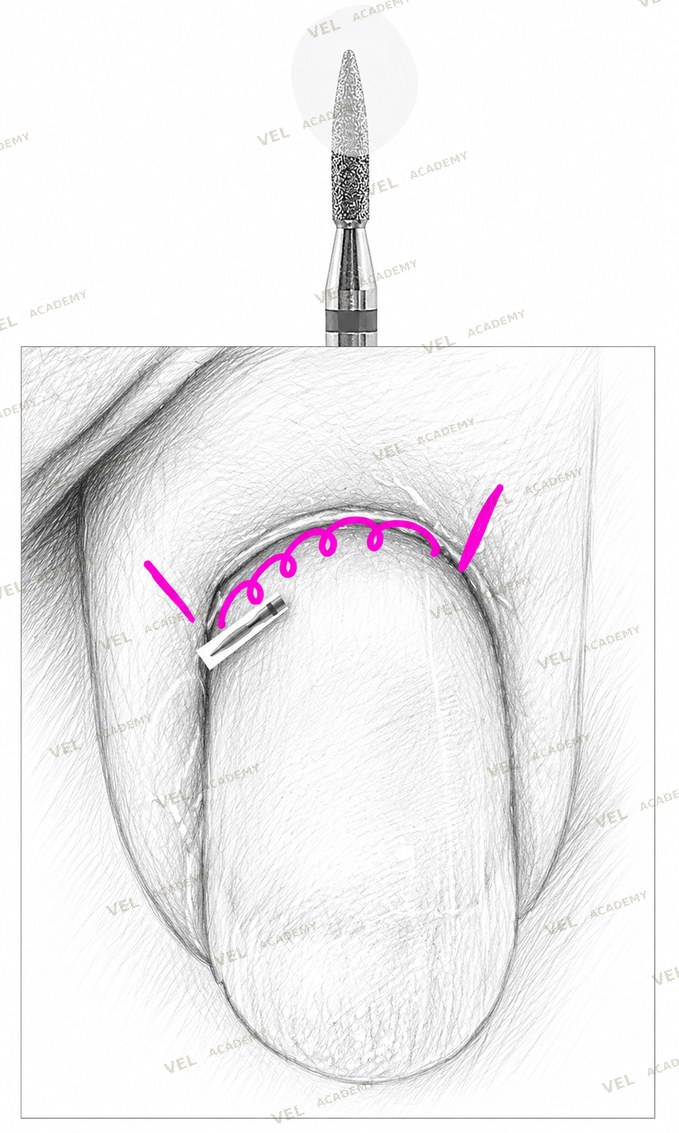
Passo 1 — Abertura do bolso
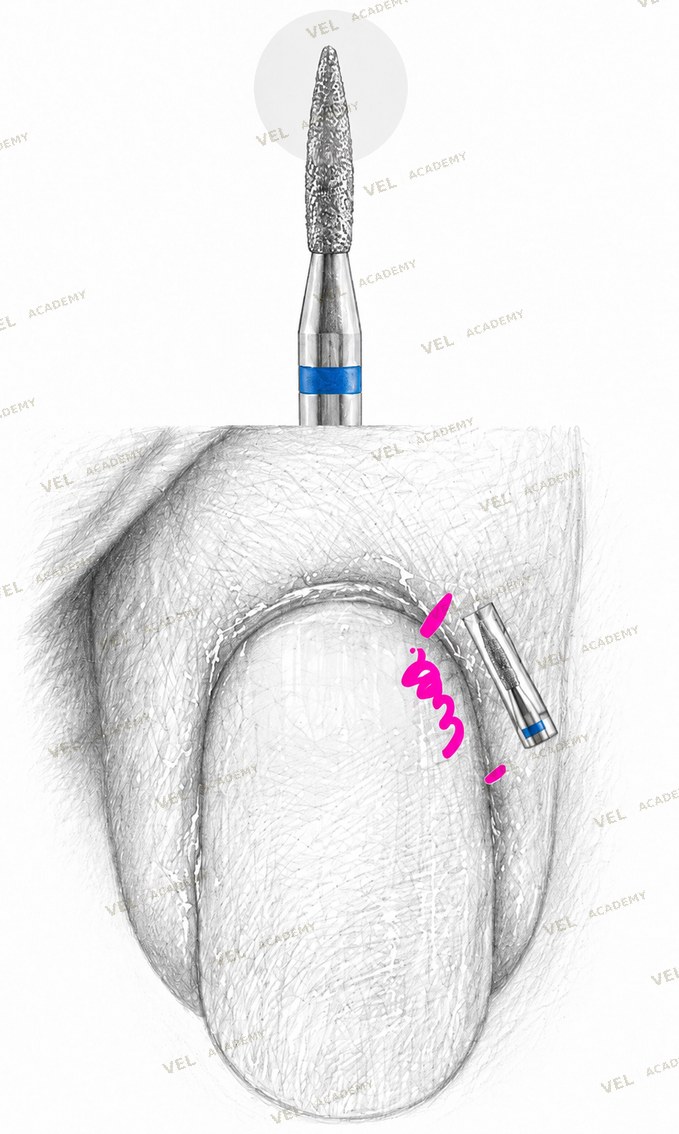
Passo 2 — Seio direito
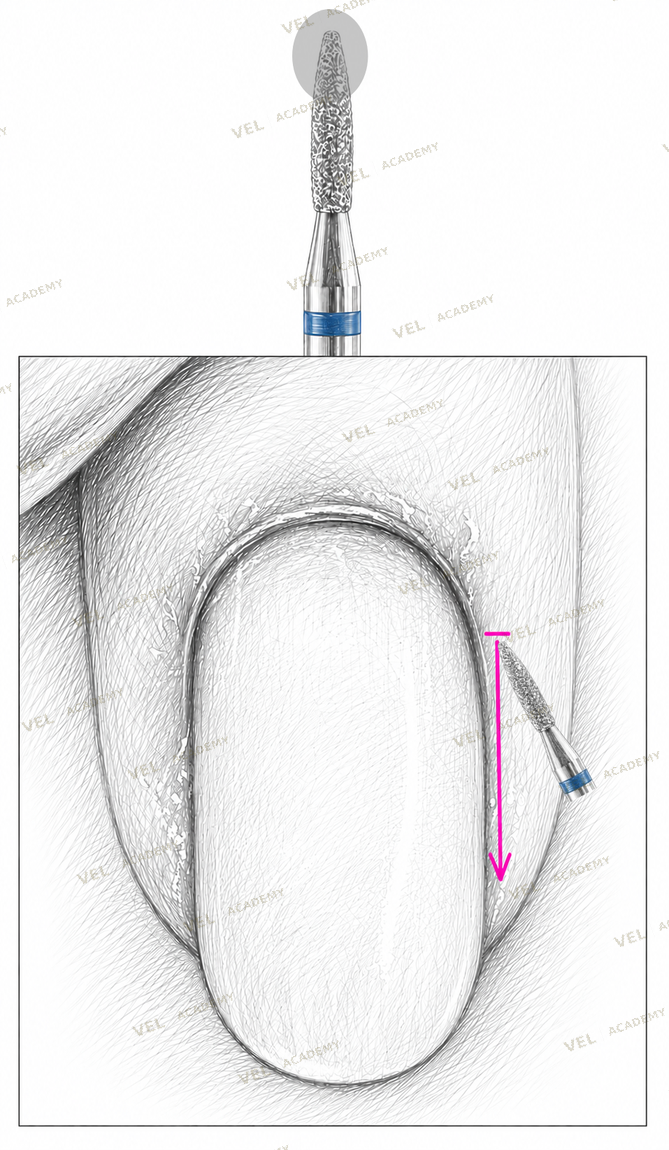
Passo 3 — Sulco lateral direito
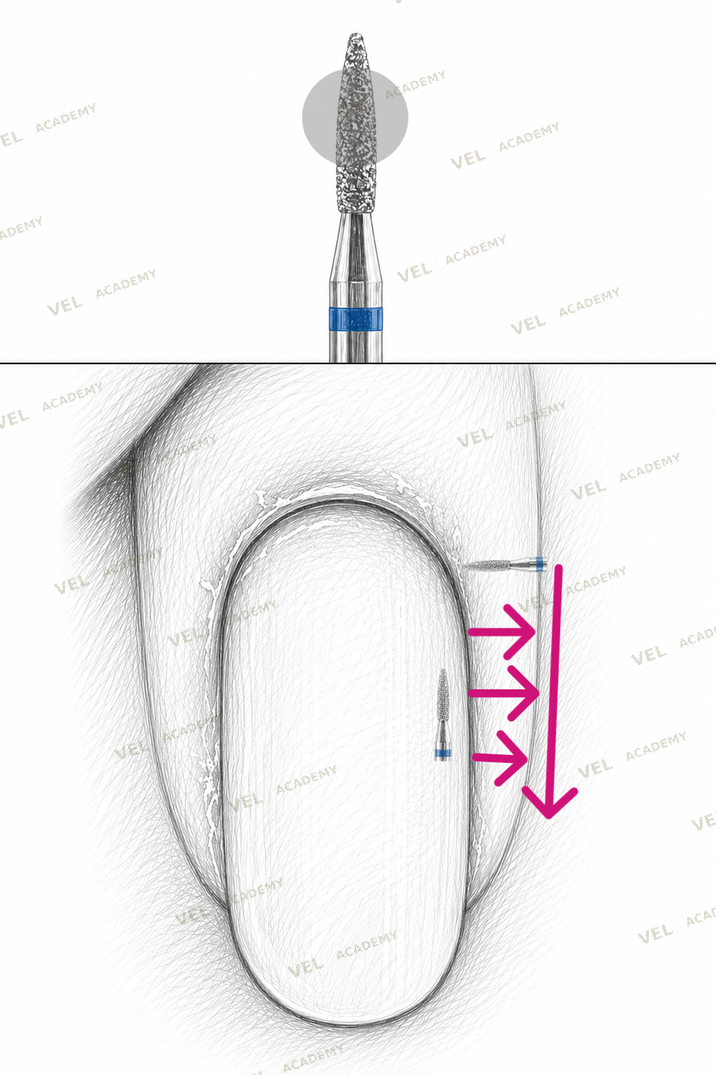
Passo 4 — Prega direita
REW passo 1 — Abertura do bolso
Posicione a ponta inclinada no seio esquerdo, com a lateral da broca pressionada para cima, contra a pele. Leve a broca do seio esquerdo até o seio direito, sem entrar nele. Esse movimento faz a abertura do bolso da cutícula em toda a largura da unha num só movimento — o ponto de partida de tudo o que vem depois no lado direito.
REW passo 2 — Correção do seio direito
Faça o acabamento da área do seio direito, se necessário — com a lateral da broca pressionada na diagonal contra a pele, removendo o pterígio perto do seio direito que a sequência FWD não alcançou. É um passo de correção, feito quando a avaliação durante o passo 1 mostra pterígio restante no seio direito.
REW passo 3 — Sulco lateral direito
Abra o sulco lateral direito: a ponta da broca entra na diagonal, funda, do seio direito até o fim da borda livre, numa única passada longa. Esse passo espelha o passo 2 da FWD, mas cobre o lado direito. A direção do movimento e o ângulo de entrada mudam porque a aproximação é feita pelo seio oposto.
REW passo 4 — Ressecamento na prega direita
Remova o ressecamento da prega direita da unha com o corpo da broca, cortando por cima. Cada movimento é repetido cerca de 3 vezes. O número exato depende da quantidade de ressecamento — mais ressecamento pede mais repetições, e não mais pressão.
--gap: 16px;
--shadow: 0 4px 20px rgba(0,0,0,0.06);
}
*, *::before, *::after { box-sizing: border-box; margin: 0; padding: 0; }
.article-wrap {
max-width: 820px;
margin: 0 auto;
padding: 60px 24px 0;
font-family: 'Montserrat', sans-serif;
color: var(--ink);
line-height: 1.8;
}
.article-eyebrow {
display: inline-block;
background: var(--gold-tint);
color: var(--gold-text);
border: 1px solid var(--gold);
padding: 4px 16px;
border-radius: 20px;
font-size: 11px;
font-weight: 500;
letter-spacing: 1px;
text-transform: uppercase;
margin-bottom: 16px;
}
.article-wrap h1 {
font-size: clamp(28px, 4vw, 42px);
font-weight: 300;
line-height: 1.2;
color: var(--ink);
margin-bottom: 12px;
letter-spacing: -0.02em;
}
.article-wrap h1 span { color: var(--terracotta); font-weight: 600; }
.article-meta {
font-size: 13px;
color: var(--ink-soft);
margin-bottom: 32px;
letter-spacing: 0.3px;
}
.article-intro {
font-size: 16px;
color: var(--ink);
line-height: 1.9;
margin-bottom: 40px;
padding-left: 20px;
border-left: 3px solid var(--terracotta);
}
.article-wrap h2 {
font-size: clamp(20px, 3vw, 26px);
font-weight: 500;
color: var(--ink);
margin: 48px 0 14px;
padding-bottom: 8px;
border-bottom: 2px solid var(--terracotta);
letter-spacing: -0.01em;
}
.article-wrap h3 {
font-size: 17px;
font-weight: 600;
color: var(--ink);
margin: 28px 0 8px;
}
.article-wrap p {
font-size: 15px;
color: var(--ink-soft);
line-height: 1.9;
margin-bottom: 18px;
}
.article-wrap ul, .article-wrap ol {
margin: 14px 0 20px;
padding-left: 0;
list-style: none;
}
.article-wrap ul li, .article-wrap ol li {
font-size: 15px;
color: var(--ink-soft);
line-height: 1.8;
padding: 6px 0 6px 28px;
position: relative;
border-bottom: 1px solid var(--line);
}
.article-wrap ul li:last-child, .article-wrap ol li:last-child { border-bottom: none; }
.article-wrap ul li::before { content: '✓'; position: absolute; left: 0; color: var(--terracotta); font-weight: 700; font-size: 14px; }
.article-wrap ol { counter-reset: item; }
.article-wrap ol li::before { content: counter(item); counter-increment: item; position: absolute; left: 0; color: var(--terracotta); font-weight: 700; font-size: 14px; }
.article-img {
width: 100%;
height: 320px;
object-fit: contain;
display: block;
margin: 28px 0 0;
border-radius: var(--radius);
background: var(--bg);
border: 1px solid var(--line);
padding: 6px;
}
.img-caption {
font-size: 12px;
color: var(--ink-soft);
text-align: center;
margin-top: 6px;
margin-bottom: 0;
font-style: italic;
}
.img-row {
display: grid;
grid-template-columns: repeat(2, 1fr);
gap: var(--gap);
margin: 28px 0 0;
}
.img-row.four { grid-template-columns: repeat(4, 1fr); }
.img-row img {
width: 100%;
height: 180px;
object-fit: contain;
border-radius: var(--radius);
display: block;
background: var(--bg);
border: 1px solid var(--line);
padding: 4px;
}
.img-row-caption {
font-size: 12px;
color: var(--ink-soft);
text-align: center;
margin-top: 6px;
font-style: italic;
}
/* === Safety Box — по спецификации (золотой бейдж) === */
.safety-box {
background: var(--gold-tint);
border: 1px solid rgba(184,150,10,0.4);
border-left: 4px solid var(--gold);
padding: 18px 24px;
margin: 24px 0;
border-radius: 0 4px 4px 0;
}
.safety-box p {
color: var(--ink);
margin: 0;
font-size: 14px;
line-height: 1.7;
}
.safety-box strong { color: var(--gold-text); }
/* === Highlight Box — по спецификации (терракотовая рамка) === */
.highlight-box {
background: var(--white);
border: 2px solid var(--terracotta);
padding: 20px 24px;
margin: 32px 0 0;
border-radius: var(--radius);
box-shadow: var(--shadow);
}
.highlight-box p {
color: var(--ink-soft);
margin: 0;
font-size: 15px;
}
.highlight-box strong { color: var(--terracotta); }
/* === Step Block — по спецификации === */
.step-block {
background: var(--white);
border: 1px solid var(--line);
border-left: 4px solid var(--terracotta);
padding: 16px 20px;
margin: 12px 0;
border-radius: 0 var(--radius) var(--radius) 0;
transition: border-color 0.3s, box-shadow 0.3s;
}
.step-block:hover {
border-color: var(--terracotta);
box-shadow: 0 4px 16px rgba(179, 69, 47, 0.08);
}
.step-number {
font-size: 11px;
font-weight: 700;
letter-spacing: 2px;
text-transform: uppercase;
color: var(--terracotta);
margin-bottom: 4px;
}
.step-block p {
margin: 0;
font-size: 15px;
color: var(--ink-soft);
}
.divider-gold {
height: 1px;
background: var(--line);
margin: 40px 0 0;
}
@media (max-width: 600px) {
.article-wrap { padding: 40px 16px 0; }
.article-img { height: 200px; }
.article-intro { padding-left: 14px; font-size: 15px; }
.article-wrap ul li { padding: 6px 0 6px 24px; }
.img-row { grid-template-columns: 1fr; }
.img-row.four { grid-template-columns: repeat(2, 1fr); }
.img-row img { height: 140px; }
.safety-box { padding: 14px 16px; }
.highlight-box { padding: 16px 18px; }
.step-block { padding: 14px 16px; }
}
Cuticle Work · FWD and REW Flame Bit Sequences FWD and REW in Russian Manicure Cuticle Work: Which Rotation Covers Which Zone and Why
By VEL Academy · Russian Manicure Professional Education
VEL Academy methodology: The FWD/REW sequence described in this article — FWD for the left side, REW for the right — is the approach VEL Academy recommends for efficient, repeatable cuticle work. Other Russian manicure schools and practitioners may use different rotation schemes or combine directions differently based on their training. The sequence here is a methodological recommendation for speed and safety, not a universal rule of the technique.
The flame bit cuticle sequence in Russian manicure is not a freehand technique — it is a defined system of movements divided between two rotation directions. FWD (forward) handles the left side of the nail. REW (reverse) handles the right side. Each direction is assigned to specific zones because of how the cutting edges of the bit engage with tissue depending on rotation. Understanding the logic makes the sequence reproducible, fast, and safe across every client.
Why Rotation Direction Matters
The flame bit has cutting edges — microscopic diamond particles arranged on its surface. These particles cut most efficiently when the bit rotates in the direction that engages their leading edge against the tissue. In FWD rotation, the bit cuts most effectively when moving across tissue from right to left — which aligns with the left-side zones of the nail. In REW rotation, the engagement reverses — making it more effective for right-to-left approach from the opposite angle.
In VEL Academy technique, this is treated as a mechanical property of how the bit interacts with tissue — and informs why the sequence is structured as it is. Using FWD for zones that should be approached in REW does not produce incorrect results, but it requires more passes to achieve the same tissue removal because the cutting efficiency is lower. In a timed service, those extra passes are time you do not have.
Both FWD and REW sequences run at 10,000 RPM — the speed that provides control without heat buildup in the cuticle zone
The FWD Sequence: Left Side of the Nail (4 Steps)
FWD rotation is used for the left side of the nail, starting from the right sinus. The sequence covers four zones in order, and the rule is absolute: complete one zone fully before moving to the next. Do not return to previous movements.
Step 1 — Pterygium removal
Step 2 — Lateral groove
Step 3 — Ridge left to right
Step 4 — Ridge top to bottom
FWD Step 1 — Pterygium Zone
Remove pterygium using the cheek of the bit at a diagonal angle, working from the right sinus to the left with short circular strokes along the nail plate. If needed, work the lateral nail wall with circular motions. The cheek — not the tip — is the correct contact point. The tip concentrates pressure; the cheek distributes it.
FWD Step 2 — Lateral Groove
Open the lateral groove: position the tip of the bit diagonally deep from the sinus and draw it to the end of the free edge in one long stroke. This stroke opens the pocket between the nail and the lateral skin fold. It is a single continuous movement — not multiple short strokes.
FWD Step 3 — Ridge Dryness (Left to Right)
Remove dryness from the nail ridge using left-to-right strokes with the belly of the bit, cutting from above. This movement addresses the upper surface of the ridge — the zone that the lateral groove stroke cannot reach because the angle is different.
FWD Step 4 — Ridge Dryness (Top to Bottom)
Remove remaining dryness from the ridge using top-to-bottom strokes. This step addresses the ridge surface that the left-to-right strokes did not fully cover. After step 4, the left side of the nail is complete — pterygium cleared, lateral groove opened, ridge addressed from both directions.
VEL Academy rule: in this technique, complete one zone fully before moving to the next. Do not return to previous movements. This recommendation exists for two reasons: it maintains the efficiency of the sequence (returning to zones costs time), and it maintains the safety of the technique (returning to a zone where pressure and angle have already been established increases the risk of catching skin).
The REW Sequence: Right Side of the Nail (4 Steps)
REW rotation is used for the right side of the nail, starting from the left sinus. The sequence mirrors the FWD approach in logic but differs in entry points and stroke directions. Each REW movement is repeated approximately 3 times — the exact number depends on the complexity of the client's hands.
Step 1 — Open pocket
Step 2 — Right sinus
Step 3 — Right lateral groove
Step 4 — Right ridge
REW Step 1 — Open the Pocket
Position the tip at an angle into the left sinus with the cheek pressed upward into the skin. Draw the bit from the left sinus to the right sinus without entering it. This stroke opens the cuticle pocket across the full width of the nail in one movement — the starting point for everything that follows on the right side.
REW Step 2 — Right Sinus Correction
Smooth the right sinus area if needed — cheek pressed diagonally into the skin, removing any pterygium near the right sinus that the FWD sequence did not reach. This is a corrective step, performed when the assessment during step 1 identifies residual pterygium at the right sinus.
REW Step 3 — Right Lateral Groove
Open the right lateral groove: tip of the bit goes diagonally deep from the right sinus to the end of the free edge in one long stroke. This mirrors FWD step 2 but covers the right side. The stroke direction and entry angle differ because the approach is from the opposite sinus.
REW Step 4 — Right Ridge Dryness
Remove dryness from the right nail ridge using the belly of the bit, cutting from above. Each movement is repeated approximately 3 times. The exact count depends on the amount of dryness present — more dryness requires more repetitions, not more pressure.